
Beating the Stock Market – With DIY Insulation – Mr. Money Mustache
We learned that a Honda Odyssey with all seats including front removed, holds exactly 41 bags of insulation.
Well, I’m almost done that house I have been rebuilding since last fall. There was a big push through the electrical and insulation stages, and then I happily handed the place off to Agustin and his crew for drywall*, which is now in its final days as well.
Insulation was a big step for me, because I’ve been talking a big game throughout this project on energy efficiency. Sure, we have plenty of high-solar-gain glass on the South side, radiant heat, loads of thermal mass from interior concrete and brick features, and a metal roof to keep heat out in the summer. But all of this goes to waste if you don’t control the flow of heat between inside and outside – which means a tight air seal and a lot of insulation where it counts.
Where it Counts
In most houses, the attic is the first place to seal and insulate. In the winter, your warm air rises and tries to sneak through the ceilings. In summer, the sun blasts down upon the roof and your ceiling becomes a radiant heater when it is least needed. And the area is especially large: in my long, flat house, ceiling is the dominant feature.
How Expensive is a Leaky Attic?
As explained in the old classic about Destroying your Heating bill, this depends on how fast it leaks, and what you pay for energy. But using figures from where I live in Colorado is a good generalization, since it has a climate about midway between the cool and warm parts of the United States.
In the dead of winter, we might have an average temperature of 32F (0C) here. The days are warmer than that, but the nights are cooler, and in energy consumption it is the average that matters. If we maintain the interior of the house at 68F, it means we are keeping our house constantly 36F warmer than the outside.
Now comes the fun part: for every square foot of house that is exposed to the cold (or heat in summer), we have heat leakage. The speed of this heat leakage depends on the r-value of the walls and ceiling. Higher R-value is better. Skipping directly to the answer to the puzzle above, a 1000 square foot ceiling with just drywall (roughly R-1 insulation)** loses 36,000 BTU of heat per hour, 24 hours a day. That is about $260 per month of energy loss.
Adding another R-1 of blown cellulose, one of the cheapest and best kinds of insulation, cuts this in half. This amount of cellulose over 1000 square feet costs about 14 bucks. This is a silly theoretical example because that would only be about 1/3 of an inch of cellulose, an amount too small to apply practically. But it sets us up for the handy chart below. We’ll approximate the total annual heating/cooling cost by using my “Four Januarys” method, which usually works out well.
Insulation Return on Investment (ROI)
(values shown are per 1000 square feet of surface area)
R ValueExtra Cost to upgrade to this levelAnnual Heating CostAnnual Return on Investment for this upgrade
0$0 Infinite0%
1$14$1040Infinite
2$14$5203700%
4$28$260928%
8$56$130232%
16$112$6558%
32$224$32.5014.5%
50$252$21About 8%
Pretty interesting stuff: every time you double your insulation, your costs double and your additional lump of savings is only half as big. But even so, the math works out that you should still insulate your attic to at least R-50, because cellulose is so cheap. And this table is for a relatively moderate area of the US, a country with the cheapest natural gas in the world. In other countries (or if you use oil or electric heat), this equation tilts even more in favor of better insulation. In other words, you can generally accomplish that almost-impossible feat of beating the stock market, just by insulating your own house.
All this is why my friend Mike, who reads this blog, needs to get with the program and insulate the shit out of the leaky attic in his 100-year-old house before the next winter season hits – no excuses!
With all that theory out of the way, here’s what I actually did in my own house. Since I built my ceilings in vaulted style, there is no traditional attic. Just 14″ roof rafters with roof deck and metal roof screwed to the top, and drywall screwed to the bottom. With about 20 recessed light fixtures in this ceiling, there is lots of potential for air leakage. So I did this:
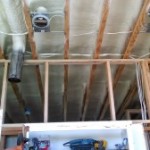
A cross section of my own roof. 2″ of spray foam plus 12″ of cellulose gives me almost R-60 total insulation!
Spray Foam Insulation
Here is my ceiling with 2″ of the amazing foam applied.
When you want to go really hardcore on insulation, closed-cell spray foam is the way to do it. It is about 10 times more expensive than cellulose for a given amount of R-value, but it has advantages that nothing else can match: a perfect air seal, double the R-value per inch, and structural rigidity.
I started my roof insulation job with 2 inches of spray foam to seal the numerous gaps in the roof framing and create an airtight roof structure that needs no venting. I also had the foam contractor fill assorted cracks around the rest of the house, and spray all exterior joist bays in the crawl space. This was expensive ($2700 for the whole project), but it accomplished the most important part of insulating: stopping air leaks. You can buy do-it-yourself spray foam kits from Amazon and Ebay, but I found that hiring a local contractor ended up being about the same price (90 cents per square foot at 1″ thick), so the decision to outsource that task was easy.
Blowing your own Cellulose
Now for the most useful part of this article: contractors were bidding upwards of $3000 to blow the 12″ of cellulose insulation into that area beneath my spray foam. Cellulose is just shredded newspapers, so it is incredibly cheap. It is also incredibly easy to install. I calculated that about $700 of the stuff was needed in my place, which left $2300 to cover a day or two of labor.
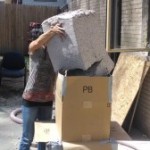
Mrs. MM loads a 20-pound chunk into a homemade cardboard hopper atop the blowing machine (long story)
Anybody with functional arms and legs can blow cellulose, so it is an ideal DIY task. You just follow these four steps:
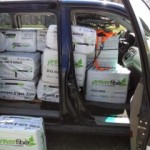
- Buy the bags of stuff at the store. It looks like this, but Lowe’s has it at ripoff pricing. The same stuff was $9.47 for the 18 pound bags at Longmont’s Budget Home Center. Each bag gives you 20 square feet at R-38. I bought 71 bags for my house. Consider delivery, because the stuff is bulky.
- Rent the blowing machine. This is just a giant reversed vacuum cleaner with a hopper on top. Most building material stores will lend you one of these for free if you buy at least 10 bags of insulation.
- Round up your spouse and have each of you put on a good breathing mask. This stuff is dusty – too dusty for the crappy fabric masks, in my opinion.
- You climb up into the attic with one end of the firehose, while your spouse hangs around outside opening the bags and heaving them into the machine. Blow the light fluffy material evenly across your attic to at least a foot deep. Pro-tip: a good headlamp makes this easier. Use mobile phones to communicate (or a remote controlled power switch) so the attic person can turn the machine on and off.
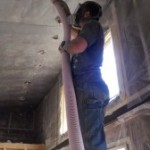
Cellulose in a Vaulted Ceiling
Here I’m blowing cellulose into the vaulted ceiling, supported by fabric.
My own job was a bit more complicated, since there is no attic. I picked up a huge roll of landscape fabric and stapled it tightly to the bottoms of the rafters with the help of a friend. Then I cut ‘X’-holes near the top of each bay and fed the blowing hose down to the bottom of the slope. Turned on the machine, and slowly filled each cavity from bottom to top. It was a bit of a pain, but in the end a rewarding day of high exertion and a worthwhile way to save a couple thousand dollars while learning a new skill.
To round out this (hopefully) well-insulated house, I caulked the interior faces of all multi-stud columns to reduce air leakage, used R-15 and R-19 batts as appropriate in the exterior walls, stapled up sheets of plastic vapor barrier across all walls before drywall, and glued up sheets of foil-faced rigid foam insulation in strategic areas where batts would not fit.
If I have done my job right, we should end up with a house where the winter sun (plus the heat given off by the people and appliances) provides for most of our warmth needs, and simply opening the windows at night provides all of our summer cooling. But if I’m wrong and further tinkering is required, that won’t be such a bad outcome either.
* This is always a semi-religious experience for a Colorado housebuilder, as you typically get a word-of-mouth drywaller referral from another builder. An earnest Mexican guy comes out to appraise your project and gives you a very fair (yet very informal sounding) estimate. You’re not sure if you conveyed everything properly due to your respective lack of Spanish and English comprehension. But the next day, when you show up at 9am to make sure they are doing well, you enter a scene of blaring mariachi music, flying drywall panels and cutting tools, and a house that is already almost done. I’ve worked with every housebuilding trade and learned to do each of them myself over the years. But the speed and skill of Mexican drywall crews remains beyond my comprehension. These guys are the superheroes of construction.
** Sounds pretty ridiculous, but it is not far off the truth for my new house when I bought it. It had drywall ceilings, and a 1″ thick layer of sawdusty wood fiber batts from the 1950s (labeled “extra thick!”). Then a vented attic right above. And even that was poorly installed with no vapor barrier and lots of gaps and holes in it. Net effect might have been R-2 or 3. I cringe when imagining this home’s previous 55 years of energy bills.
Original article –
Beating the Stock Market – With DIY Insulation – Mr. Money Mustache
See which stocks are being affected by Social Media